UITableViewController, Hide Status Bar
UITableViewController
In order to show a table in your application you should use table view and it's controller. By default application adds a View Controller in the story board. We need to delete that and drag a Table View Controller into the story board. We also have to delete the ViewController.h and ViewController.m (Move to trash). Then we have to create a new file for our Table View Controller. Command + N or in File menu New/File..., Hit Next button and then give it a name like ContactTVC. Add subclass as: UITableViewController and hit Next button and then Create button.If you open ContactTVC.m you will see some default methods. We need just the following methods
viewDidLoad
numberOfSectionsInTableView:
numberOfRowsInSection:
cellForRowAtIndexPath:
You can remove the rest of them or keep them as is.
#pragma mark -
The brown line of code that starts with #pragma is just for the convenience of developers to categorize their methods so they can find them easily. For example by specifying following three methods underneath #pragma mark - Table view data sourcenumberOfSectionsInTableView: numberOfRowsInSection: cellForRowAtIndexPath:

Table View Components
The following picture shows two sections with their components. From top level we have sections, then for each section we have header and footer.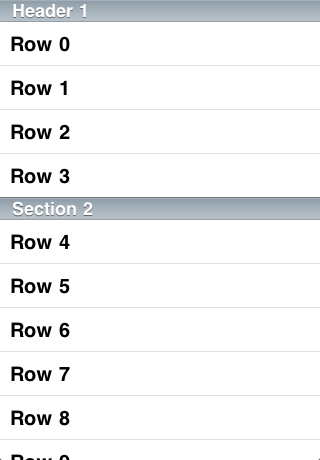
numberOfSectionsInTableView
In this method you specify the number of sections that you want to have in your table. If you delete this method the default value is 1. Since we only have 1 section in our table we put number 1 as a return value.- (NSInteger)numberOfSectionsInTableView:(UITableView *)tableView
{
return 1;
}
numberOfRowsInSection
In this method we specify the number of rows in each section. because we have only one section so we return only one value. We don't want to hard code this value, we want it to be dynamic. It should be equal to the number of items inside of our array. What is our array? Since it's a contact list application we need to have some names. We create a NSArray property and we put all of the names inside of this array like bellow.@property (nonatomic, strong) NSArray *names;We lazily allocate and initialize our array from it's setter by writing
- (NSArray *)names
{
if(_names == nil)
{
_names = [[NSArray alloc] init];
}
return _names;
}
Then we add our names inside the array in viewDidLoad method (View life cycle).
- (void)viewDidLoad
{
[super viewDidLoad];
self.names = [NSArray arrayWithObjects:@"Kasra", @"duboisvb", @"Brendanrooney", @"Magdalena", @"Shrikant", @"Subramanian", @"Revanth", @"Антон", @"Venkateswara", @"Neil", @"Rajesh", @"CulquiproduccionesX3", @"李宗国", @"Ahmed", nil];
}
Now we can add our dynamic number of rows in each section with help of count method. It returns the number of items inside of the array.
- (NSInteger)tableView:(UITableView *)tableView numberOfRowsInSection:(NSInteger)section
{
return self.names.count;
}
cellForRowAtIndexPath
It's time to add our data inside of each cell. We uncomment the cellForRowAtIndexPath method and create a cell with reusable identifier. iOS reuses cells for showing table view so it needs and identifier. In order to define an identifier we need to go to the story board and select the cell. Then from Attribute Inspector add a name inside of identifier field, like "Cell". Then you come back to the ContactTVC.m and add the same identifier you defined in story board in front of dequeueReusableCellWithIdentifier:. Next we check if the cell is nil we allocate and initialize memory for it. Then we use "textLabel" and its property "text" to set the label of our cell.We want each array items to be shown in different row. So we use one of the arguments of this method which is "indexPath" and it's property "row". It returns the number of the row that is being set. Finally we can use NSArray method for returning array object based on their index, which is objectAtIndex. At the end we return the cell.
- (UITableViewCell *)tableView:(UITableView *)tableView cellForRowAtIndexPath:(NSIndexPath *)indexPath
{
UITableViewCell *cell = [tableView dequeueReusableCellWithIdentifier:@"Cell" forIndexPath:indexPath];
if( cell == nil)
{
cell = [[UITableViewCell alloc] init];
}
cell.textLabel.text = [self.names objectAtIndex:indexPath.row];
return cell;
}
Connect the view controller to it's class
If you run the app now, it would bot show anything because we have not connected the Table View Controller to the File that we created (ContactTVC). In order to connect it, go to the storyboard, select the view controller, then from identity inspector open the Class drop down menu and select the class that we created, which is ContactTVC. Now if you run the application it shows the names.Hide Status Bar
If you notice, the status bar is over our names, so let's get rid of it. Under you project navigator open the "Supporting Files" group folder. Select .plist file. Click on the last item of this list. A plus button will be shown, click on the plus button and in the new row, type: "View controller-based status bar appearance". For the value of this row, select or write "NO". Again create another row and this time write: "Status bar is initially hidden" and for value type "YES". Now if you run the application, status bar is gone.Add subtitle for Cell
In order to have phones under each name, we should follow the same pattern and create an array then add all phones. But this time instead of textLabel we use detailTextLabel.cell.detailTextLabel.text = [self.phones objectAtIndex:indexPath.row];If run the application it would not show the subtitles because we have not specified the style of the cell. We can do it either programmatically or in story board. In story board click on the Cell and from Attribute Inspector open style drop down menu. You can choose your style here. For this application we choose Subtitle. Now if you run the application it would show the numbers under each name.
Add Image to the cell
In order to have an image for each cell, we can follow the same pattern but since I have only one picture for all cells its much easier because I don't need array anymore. I just have to set the property called cell.imageView.image. First we have to drag and drop our image inside of xcode. There is a folder called Images.xcassets, click on this folder and drag your image (If it's .png) under launchImage. 1x is for regular display and 2x is for retina display. If you have better resolution of this image with larger size you can drop it in 2x place holder. Now all you need to do is to call the UIImage method to grab the image and then set it for each cell.cell.imageView.image = [UIImage imageNamed:@"Rose"];"Rose" Is the name of the image file that you added to the Xcode.
Static table view, Header & Footer
All of above settings were for Dynamic contents. We have Static content, which is very easy to set. You can set it inside of the story board. Static content means that the number of the rows and sections are fixed and static. Since it's fixed we can change their labels right from the story board. In order to change the content mode from dynamic to static, open story board, click in the middle of the Table View Controller, where it has a text "Table View Prototype Content", then open Attribute inspector. From Content drop down menu you can select static. By default it has 3 rows but you can set as many as you want by opening "Editor / Show Document Outline" In Xcode menu bar. Then under Table View, tap on Table View Section and open Attribute Inspector. You can set the number of rows and also Header and Footer of the section.
All of the code for this tutorial
ContactTVC.m#import "ContactTVC.h"
@interface ContactTVC ()
@property (nonatomic, strong) NSArray *names;
@property (nonatomic, strong) NSArray *phones;
@end
@implementation ContactTVC
- (NSArray *)names
{
if(_names == nil)
{
_names = [[NSArray alloc] init];
}
return _names;
}
- (NSArray *)phones
{
if(_phones == nil)
{
_phones = [[NSArray alloc] init];
}
return _phones;
}
- (void)viewDidLoad
{
[super viewDidLoad];
self.names = [NSArray arrayWithObjects:@"Kasra", @"duboisvb", @"Brendanrooney", @"Magdalena", @"Shrikant", @"Subramanian", @"Revanth", @"Антон", @"Venkateswara", @"Neil", @"Rajesh", @"CulquiproduccionesX3", @"李宗国", @"Ahmed", nil];
self.phones = [NSArray arrayWithObjects:@"111-111-1111", @"222-222-2222", @"333-333-3333", @"444-444-4444", @"555-555-5555", @"666-666-6666", @"777-777-7777", @"888-888-8888", @"999-999-9999", @"101-010-1010", @"111-111-1111", @"121-212-1212", @"131-313-1313", @"141-414-1414",nil];
}
#pragma mark - Table view data source
- (NSInteger)numberOfSectionsInTableView:(UITableView *)tableView
{
    return 1;
}
- (NSInteger)tableView:(UITableView *)tableView numberOfRowsInSection:(NSInteger)section
{
    return self.names.count;
}
- (UITableViewCell *)tableView:(UITableView *)tableView cellForRowAtIndexPath:(NSIndexPath *)indexPath
{
UITableViewCell *cell = [tableView dequeueReusableCellWithIdentifier:@"Cell" forIndexPath:indexPath];
if( cell == nil)
{
cell = [[UITableViewCell alloc] init];
}
cell.textLabel.text = [self.names objectAtIndex:indexPath.row];
cell.detailTextLabel.text = [self.phones objectAtIndex:indexPath.row];
cell.imageView.image = [UIImage imageNamed:@"Rose"];
return cell;
}
@end
how to display data in multiple section and group them
ReplyDelete